Get the most out of your canti brake...
Most People dissatisfaction with them is simply because they aren't set up properly.
There are several things that affect cantilever brake performance and they are all easily addressed and fixed. The first one is the actual brake pad itself. A thick brake pad, like the one used on Shimano canti brakes during the hey day of cantilever equipped mountain bikes is the worst choice for good performance (and maybe this is where the root of cantilever hatred lies). A thick brake pad may last a long time but the brake power is losted.
Thick pads are squishy. When you apply the brakes on a bike with thick pads by squeezing the lever, the pad hits the rim and as you squeeze, you might feel mush. Part of that is the pad compressing. To solve this issue, thin brake pads are immensely helpful. The KoolStop Thinline pad works great. Very little flex/compression going on at the brake pad if you are running Thinline pads. But the thin pads will wear out faster. So what. This simply means that the brake adjustment - the pad to rim contact - will be optimal longer.
Pad positioning on the arm with threaded pads, you have to make the pad to arm junction as close to 90 degrees as possible when the pad hits the rim.
What does this mean? threaded pads have a series of washers that fit on both sides of the brake arm. The spot where the pads fit on the arms is slotted for up and down adjustment. Try to make this slotted part of the arm be perpendicular to the brake pad post when the pad contacts the rim. Why? Because this lets the pad hit the rim as squarely as possible. Too far past 90 degrees and the brake loses power (especially true with v-brakes) and when the arm is past 90 degrees, it's on its way to promoting the pad diving under the rim. Square up the arm/pad/rim geometry. This is easy to do by making sure the concave/convex washers are on the proper side of the arm. The Thinline pads also have another 1mm thin washer to further fine-tune this aspect. On canti brakes with eye bolts, it's easy to move the pad to its desired position.
Straddle cable and yoke position is crucial to get the straddle cable carrier (yoke) installed in the right position based on the type of brakes you are running. Simply put, you want to try to achieve a 90 degree angle between the pivot bolt/cable anchor/straddle cable. The angle formed if you drew a line from the pivot bolt to the cable anchor on the arm and along the straddle cable should be around 90 degrees. This gives you a good combination of modulation and power. It's possible to alter this angle to get more power, giving up modulation. A rough rule of thumb is low-profile brakes require a low straddle cable carrier position, wide profile brakes require a high straddle cable carrier position. Going even lower on a low-profile brake will give you more power, but the modulation will be lower and the brake pads will need to be set closer to the rim. This position also will feel a little mushy at the lever. Most lower profile canti brakes I see have the straddle carrier set too high. This might feel good at the lever; solid feeling, you might say, but when you need to hit the brakes you won't have the power needed to stop.
Other overlooked details are cable flex and cable line. You've just tightened the bolt securing your straddle cable and you think you're done. After all, the brake pads are adjusted. The straddle cable carrier is positioned just so. The lever works. The pads close and open. However, chances are, you are not done. There's one more trick you can do to get the most out of your canti brakes. Straighten the straddle cable. If your straddle cable has any kind of curve to it between the brake arm and the carrier yoke, when you apply the brake lever, some of that lever movement is taken up in straightening the cable. By physically bending the cable over the yoke and where it's anchored, you'll get a straight line and all of the lever movement will go into applying brake pressure to the rim.
To fully embrace the cantilever brake. It's pretty awesome when it's set up properly. Here's some photos illustrating (hopefully) cantilever brakes.
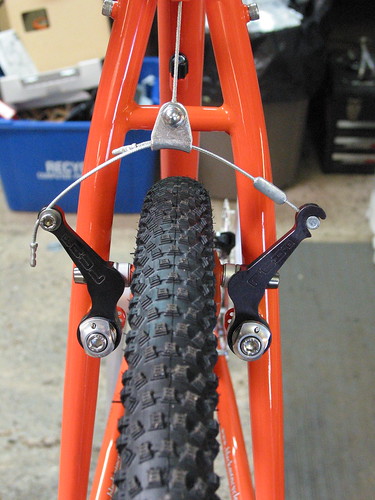 Notice the curve in the straddle cable. This is before straightening it.
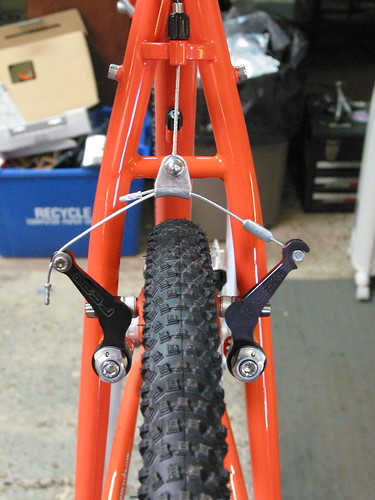 After straightening. Simply bend the straddle cable with your fingers where it comes off the yoke. Easy.
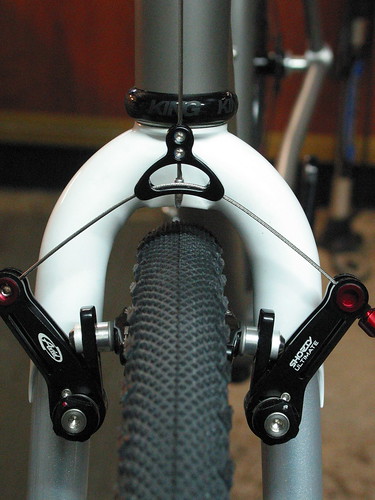 Avid Ultimate are the best Canti brakes made so far But cost loads
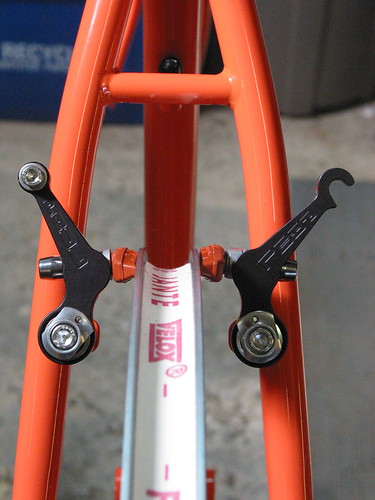 The right arm has the pad set up properly with the thick washer on the inside. The left arm has the thin washer on the inside and the arm is past the perpendicular position to the rim.
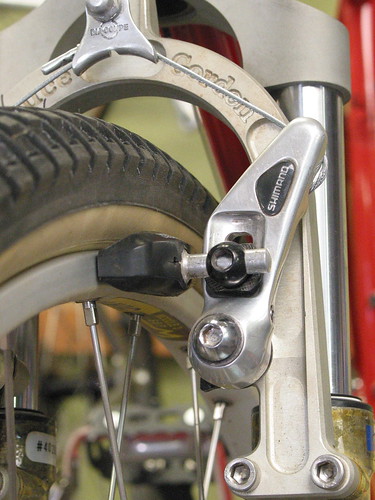
An example of a thick brake pad that can potentially rob the brake of power. Is it a coincidence that this brake arm shape, coupled with the thick pad, and that all of these brakes, at the time, were supplied with a one-piece straddle cable assembly that did not allow for proper straddle height came out in the heyday of the mountain bike which means that the vast majority of people were simply set up with canti brakes that weren't optimal. Could this be the impetus of cantilever disdain?
I do not use one-piece straddle cable carrier when I set any one Canti Brakes because the straddle height is not right for optimal performance. Many cantilever brakes are supplied with one-piece straddles in various lengths that can be used to get a proper straddle position, but its ever right! so I set up my brakes with a Yoke and Cross cable as above and bin the cable's below!
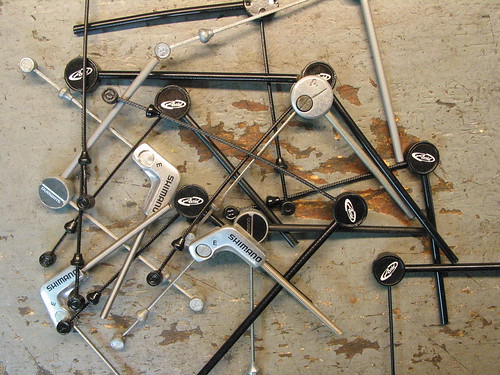
So are V-Brakes or Canti Brake's Best! as above most brakes are set up badly in the 1st place and most people (and Cycle Shop Mechanics) do not know how to set up Canti Brakes.
So if you set up a pair of Canti Brakes as above then they are the same, V-Brakes where made in the 1st place to save time when bikes are build up overseas.
If you take your time and set up your V-Brake as above you will have brakes that are far better most Disc Brakes made! it's all in the set up
 Pete
Pete 